Wednesday, March 24, 2010

French quail

I love dollar store crafting...transforming a plain (or plain ugly) item into something funky or beautiful is a fun challenge. I bought this little guy at Dollar Tree and decided to give him a makeover to fit in with my black and white French collection.


First up was two coats of acrylic paint...I chose Delta Ceramcoat Oyster White. Because the bird is resin, it took longer than usual for the paint to dry. I used a sponge brush because the surface is rough and I didn't want to ruin my good brushes (been there, done that). Thin coats are always better than thick. To paint around the eyes and legs, I used a cheap paintbrush from a children's set. Looking at my painted bird, something seemed "off." It was the beak...I should've left it unpainted. Oh, well, nothing a little black paint won't fix.


I wanted to add a light, curlicue-type of design using black cardstock, so I searched through my Cricut cartridges and found this leaf on the Stretch Your Imagination cart (*see Cricut cutting details at the end of this post). You also could freehand a design on cardstock and cut with an X-acto blade, use patterned paper and cut a wing shape, or use stickers. Rub-on transfers won't work as the surface is too uneven. After trimming off the stems of my leaves, I brushed some Mod Podge on the back of the cardstock and pressed the elements in place. They bonded almost instantly, so I didn't have to hold them down forever. My bird needed a little something extra, so I gave him a crest feather like a quail, cut from black cardstock and attached with Mod Podge.

For more dollar store bird projects, check out Dollar Store Crafts.

*Cricut cutting info: Stretch Your Imagination cart, low speed, pressure 4, blade depth 4. Wings cut from 'leaf-s' with Silhouette feature on (push flip button for one wing), size 2 inches. Tail cut from 'leaf' with Silhouette feature, 1-1/2 inches.

Monday, March 22, 2010

Cricut contests

Check out FaveCrafts and enter to win some Cricut products. They are giving away a copy of Card Making with Cricut (ends March 30th), and also a Sweet Treats cartridge (ends April 2nd).

Good luck!

Saturday, March 20, 2010

T-shirt design with freezer paper

Happy first day of Spring!You can never trust spring weather in Chicago. See the little bird on the driveway? Poor thing looks lost. I guess the trellis project is on hold, too. Oh, well...next weekend I bet it'll be 80!

Because it's almost t-shirt weather, I thought I'd share my freezer paper stencil tutorial. I was skeptical about this technique at first, but it really works! It's not easy to find freezer paper these days...it took me two trips...but it must be freezer paper (not waxed paper, not parchment paper).

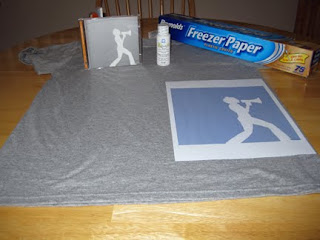
Besides freezer paper, you need a t-shirt, fabric paint and brush, an iron, an image to trace, a pencil, and an X-acto knife or small scissors. Wash and dry your t-shirt first, but DO NOT use fabric softener. Most fabric paints will adhere to fabric that's a 50/50 blend, but some require 100% cotton, so check the bottle. I used Plaid Folk Art Fabric Paint. It dries soft and flexible, and is very durable. After 6 months this t-shirt has one small crack in the paint.

For this stencil, I chose an image from a CD of one of my daughter's favorite bands, Superchick (site plays music, FYI). I enlarged it in Photoshop and printed out a copy. If your image has strong, dark lines, you might be able to place it under the freezer paper and trace. Mine was too light, so I covered the back of the copy with pencil. Then I placed it on top of the freezer paper and traced over the image. You can freehand a drawing if you're talented. :) BTW, you want to draw your image on the paper side, not the plastic side.

Start cutting out your image using an X-acto blade or very sharp, small scissors. Remember you are creating a stencil, so you need to have the outside of the image in one piece. Don't panic if you make a mistake; I cut through the bottom of the stencil by accident, but I just ironed it down and it worked fine. Place the freezer paper, plastic side down, on your t-shirt. Heat your iron on a cotton/no steam setting. Holding the paper steady, place the iron on top of the paper for a few seconds. Lift the iron and place it back down in another spot instead of running it back and forth like you were ironing a shirt. When you think you're done, check all of your edges and make sure they're securely against the fabric.

Use a t-shirt painting board or layer some newspapers inside the t-shirt so the paint won't bleed through to the back of the shirt. I like using a painting board or piece of cardboard because I only have one dining table and I can move the board without messing up the paint. In the past I have painted on fabric using regular acrylic paint and textile medium. It dries quite stiff on top of the fabric and is prone to peeling and cracking, so I recommend a fabric paint. I used a foam brush to dab paint inside the stencil. I dabbed and brushed, then moved to the next area and dabbed/brushed. Now let your paint dry, following the instructions on the bottle. Mine said to air dry for 24 hours, but I peeled off the stencil after about 6 hours. Start at one corner and peel gently, especially when you get to the painted area.

Look at the detail! Nothing leaked under the paper. Some paints need to be heat set...I waited the required 24 hours, then placed a piece of freezer paper over the design and ironed using the cotton setting. I moved the iron around quite a bit so it didn't really stick to the fabric. Using freezer paper supposedly helps set the paint better.

And here's the final product. Be sure to follow the washing instructions for your brand of paint. (Mine says wait at least 72 hours, turn garment inside out, and wash on gentle in cool water.)

Friday, March 19, 2010

Tie Dyed Easter Eggs

Here's a super easy way to make eggs that look like they've been tie dyed. The key is using neon food coloring because the colors are deeper and brighter even when dried. The daughter and I made these last year.

What you need: hard boiled eggs, large metal colander, white vinegar (1/2 cup for a dozen eggs; use 1/4 on 6 eggs), McCormick NEON food coloring, water and sink

*You might not want to do this if you have a white sink that stains.*


Place 5-6 hardboiled eggs in a large metal colander...they need some room to roll around, so do smaller batches if your colander is smaller. Splash with 1/4 cup of vinegar, then put one drop of food coloring on each egg and roll the eggs a little in the colander. Let set 30 seconds, then use a second color of dye on each egg and roll. Let set 30 seconds. Repeat with a third color if you want, but any more than that and the colors get muddy. After the last color sets for 30 seconds, lightly pour water over the eggs and let drain for 2-3 minutes. Put eggs on paper towels to dry.

Welcome

Spring is teasing us again in Chicago with temps up to 60 degrees. My clematis vines have poked through the mud and by tomorrow they will have reached the bottom of the trellis...the rotting trellis that needs to be rebuilt. Guess we know what the husband will be doing this weekend! (Don't feel sorry for him...he misses his workbench, and a trip to the Lowes lumberyard is his idea of fun.)
The Leaning Trellis of Chicago in 2008.

Why a new blog? In the spirit of spring and new beginnings, I decided...wait, that's not true. You see, it's the fault of my sister-in-law. I love to make things, and I enjoy finding new ideas on the web. Whenever I share something with Sue, she says, "That's really cute. You should have your own craft blog!" She can be very persuasive, so here we are.


My wonderfully patient husband not only puts up with my crafting mess, he actually encourages it. Including the years we dated, we've been together more than 20 years, so that's a lot of messes! (That didn't come out right.)We also have a lovely daughter who is 13 and most likely will roll her eyes at mom's blog. (That's a safe bet...take it.)


I love being a mom and an Awana leader at church. I'm also a former Girl Scout leader, so you'll find some kid-friendly crafts here. Eventually you can expect to see a lot of my favorite things: the Cricut, Mod Podge, and glitter. I have clothes stained with acrylic paint, and my old kitchen table was ruined by an unfortunate glue gun accident. We won't discuss the apartment carpet incident of '97.